
 |
| The Arduino Team. They created the Arduino, and gave it to the world. We owe it to these guys. (back) Dave Mellis, Tom Igoe; (front) Gianluca Martino, David Cuartielles, Massimo Banzi Photo Credit: http://www.arduino.cc |
When we first toyed with the idea of bringing in the Arduino, I was a bit reluctant. It featured something that gave me a bit of discomfort – it was too easy to use. Why would that be a problem? Ease of use has its consequences. So much details are hidden when one start working at the top (Arduino) level. My worst fear is people may go about using it without ever learning the basics (of microcontrollers and peripherals).
But ease of use, on the other hand, has its advantages too. There is that likelihood that ease of use can lure more people to try their hands with it, hence, through it, enters the world of microcontrollers and their applications. That’s a strong reason that convinced me to go ahead building our local version of the Arduino hardware- the gizDuino.
And so with the help of friends (of e-Gizmo) and a lot of noises, we got the attention of our locals – teachers, students, and hobbyists. Two years thereafter, everybody now wants an Arduino (gizDuino).
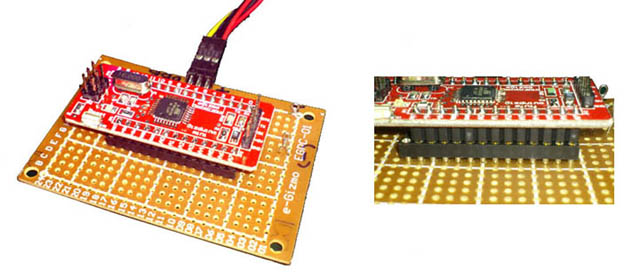
Introducing gizDuino minis
Encouraged by the wide acceptance of our gizDuino, we are now introducing several hardware variants of the gizDuino, starting with the mini lines.


A USB programmer dongle for the gizDuino mini can be built easily using an e-Gizmo USB to UART converter kit. If that sounds like a hard work to you, you can buy a ready to use kit from e-Gizmo.
A separate USB to UART converter board is required to program the gizDuino minis using the Arduino IDE. Should you decide to level up and want to program the device using advance programming tools, such as winAVR, an ICSP in-circuit programming port is present on-board.

gizDuino minis will be initially available in four variants, listed as follows according to the MCU type. This gives you the option to pick one suitable enough for the intended application- no more paying for extras you do not need.
gizDuino mini Bootloader MCU Memory Size Speed
gizDuino mini8 Optiboot ATMEGA8L 8K Flash 8MHz
gizDuino mini88 Bootloader ATMEGA88 8K Flash 16MHz
gizDuino mini168 Optiboot ATMEGA168 16K Flash 16MHz
gizDuino mini328 Optiboot ATMEGA328 32K Flash 16MHz
gizDuino minis are also available without the I/O header pins installed. This gives you freedom to choose and install the type of connectors more suitable for your kind of assembly.
di ba pweding gamitin ang 5v supply mula sa usb to uart converter para eh power ang mini?
ReplyDeleteSo pwede po bang gamitin +3.3v dito? kasi dun sa schematics nya walang regulator... pero naka specify dun sa board dalawang +5v O_o
ReplyDelete